Upload File to Server Using Sftp Windows 8
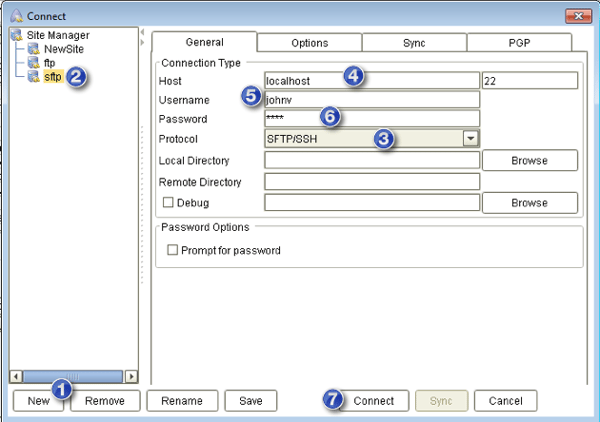
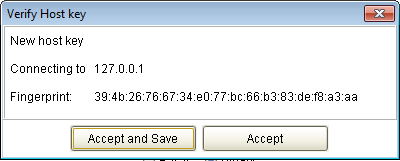
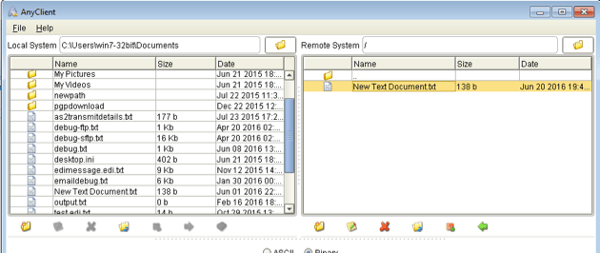
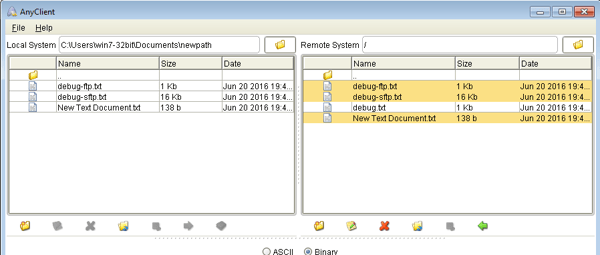
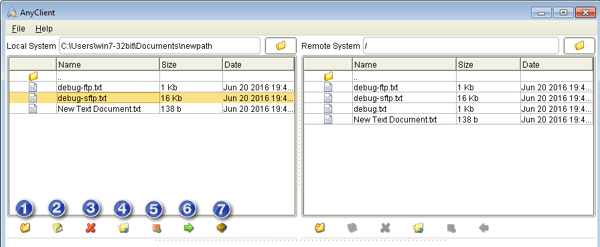
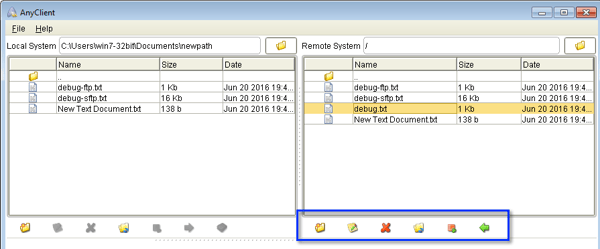
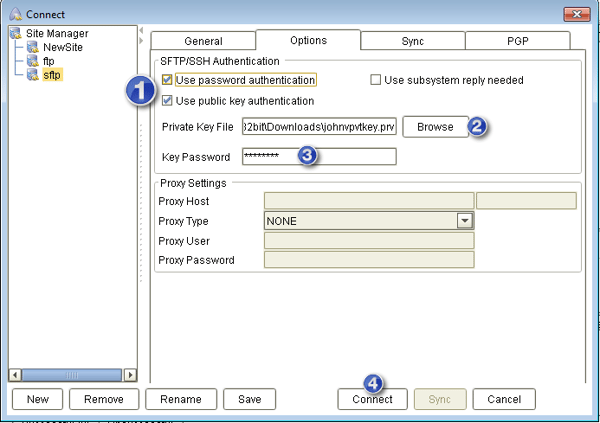
Windows doesn't have a built-in SFTP client. So if yous're looking to transfer files with an SFTP server but are using a Windows machine, you might desire to check out this mail. For this tutorial, we'll be using AnyClient, a platform-independent (significant it runs on Windows, Linux, Mac Bone X, Solaris, etc) file transfer client that supports SFTP as well as other file transfer protocols like FTP/Southward, SFTP, WebDAV/S, Amazon S3 and AFTP. To commencement, download the appropriate installer. You'll notice that AnyClient has installers for diverse operating systems. Two of these run on Windows. Since Windows comes in 32-bit and 64-fleck versions, you'll need to download the installer that corresponds to the version you lot're using. In one case yous've downloaded and launched the advisable installer, you'll be faced with the AnyClient Setup Magician. Click the Next button and follow the instructions shown thereafter. Equally soon you consummate the installation, leave the "Run AnyClient" checkbox checked and click the End push button to automatically launch AnyClient. Being a Windows SFTP client, AnyClient is capable of transferring files over an encrypted channel. That means, it'southward suitable for uploading and downloading files that require high levels of confidentiality. Like other Windows SFTP clients, AnyClient likewise supports the use of SFTP central authentication a.yard.a. public key authentication. In the succeeding sections, we'll show you how to use AnyClient to connect to an SFTP server, upload and download files, and login via public key hallmark. Ready? Let'southward proceed. Once you've launched AnyClient, you'll be brought to the post-obit screen (see screenshot below). Click the Connect/Sync button. The first thing yous'll need to do is set up a "site". A site holds all the necessary information yous need to connect to your SFTP server. Follow these steps to create a site. Y'all may apply the screenshot below as a guide. 1. Click the New button. This will create a new item under the node labeled "Site Manager". ii. Rename that newly created item. I but entered "sftp" but you lot might want to use something more descriptive, similar "SFTP server of Visitor so so". three. Expand theProtocol drop-down list and select SFTP/SSH. Observe that there are other file transfer protocols on that list. That should give yous an thought what other file transfer servers AnyClient tin can connect to. 4. Enter the Host name or IP address of the server you're connecting to. In our instance, nosotros're just connecting to a server installed on the same machine as the customer, then we simply entered 'localhost'. 5. Enter the Username of the account you'll be using to access the SFTP server. Note that you'll demand to have an existing account on the SFTP server before you can connect. vi. Enter the username's corresponding Countersign. 7. Once y'all're done inbound the bones information, you lot may click the Connect button to see if y'all tin can actually connect. If everything's expert, I suggest you click the Save push button to salvage all the information yous just entered. This volition allow you to easily admission the same service using the same user account in the future. The starting time time you connect to the server, you'll exist shown this dialog, which contains the fingerprint of the SFTP server's public key. The fingerprint uniquely identifies the SFTP server. Of course, the public key also uniquely identifies the server just it'southward ordinarily very long. That's why its corresponding fingerprint is normally shown in its stead. If you merely click Have, this dialog will reappear each fourth dimension you connect. To foreclose that from happening, clickHave and Save. Once you do that, your customer volition save the relevant information, i.e. IP address/hostname and the corresponding fingerprint. The client will so utilize this data to verify the identity of the server every time information technology connects. If the server submits a fingerprint that doesn't match what was previously saved, the dialog will again reappear. This could mean one of three things: 1. The public key on the server was inverse. 2. The client is connecting to a different server found in the same cluster equally the one it previously connected to (e.one thousand. when the two servers are behind the same load balancer, and hence are showing the same IP to the client but have different public keys) 3. The client is being subjected to a man-in-the-middle set on. For security reasons, it's therefore important to check with the server'south administrator if the dialog reappears even if you've been connecting to the same server (and accept clicked Accept and Save) ever since. Information technology's time to get into the meat of this tutorial. Let's now hash out how to upload and download files on this Windows SFTP client. Before we proceed with that, allow me to orient yous get-go with the user interface. As shortly as you've connected to the server, you'll be presented with the user interface shown below. That huge console on the left represents your local file system. There you'll see the files and folders on your laptop or desktop. That huge panel on the left, on the other hand, contains all the files and folders on your SFTP server. Depending on the SFTP server, the files and folders yous'll see on the correct may exist express to those where you accept access rights for. Navigation is very similar to nearly graphical file managers. You merely double-click a binder to navigate into it. To upload a file, just practice the following: 1. Navigate into the folder that contains the file y'all desire to upload and then select the file by clicking it. two. Navigate into the remote folder where you desire to upload the file. 3. Click the correct-pointing pointer below the "local" panel to upload. If everything goes well, you should and then run across your newly uploaded file in the 'remote' panel. The download procedure is similar to that. In the screenshot shown below, nosotros have selected multiple files. You tin can use the same hot keys as your operating system'southward for selecting multiple files. And so, basically, the download procedure consists of: 1. Navigating into the folder that contains the file(s) you want to download so selecting the file(south) in question. 2. Navigating into the remote folder where y'all want to download the file. 3. Clicking the left-pointing arrow below the "remote" console to upload. Here's the screenshot showing the newly downloaded files. AnyClient supports several other functions. These functions correspond to the numbered icons shown in the screenshot below: 1. Create a new folder 2. Rename the selected file or folder 3. Delete the selected file(southward) or folder(southward) 4. Refresh the folder v. Resume an interrupted upload 6. Upload the selected file(s) 7. Nil the file before uploading The same functions can likewise be found in the 'remote' organisation. One of the major advantages of SFTP over FTP and other less secure file transfer protocols is its ability to provide two-factor authentication. SFTP provides 2F through what is known as public key authentication, a process that allows the server to authenticate the user based on something he/she has (specifically, a user'southward individual key). When used in conjunction with password-based authentication (which authenticates the client based on something the user knows), the server tin can authenticate with a much higher degree of certainty. If y'all're non familiar with 2 factor authentication and public fundamental authentication, feel gratuitous to click the links in the previous paragraph. In guild to login via ii factor authentication, navigate to the Options tab and then exercise the following: 1. Check both "Use countersign hallmark" and "Use public key authentication". ii. Browse and select the user's private key. 3. Enter the private central'due south password/passphrase. iv. Click the Connect button. That's information technology! Would you similar to try this yourself? Download AnyClient now. Overview
Installation


Connecting to a SFTP server

Uploading and Downloading files


Using SFTP public key authentication

Related posts
How To Install A SFTP Server on Windows
Install A Linux SFTP Server Via Control Line and Configure Via Web UI
How To Ready An Automated SFTP Download
Source: https://www.jscape.com/blog/a-quickstart-guide-to-transferring-files-using-a-windows-sftp-client
Post a Comment for "Upload File to Server Using Sftp Windows 8"